


Just like in FDM printing, resin prints can go bad. The failed prints that I find the most frustrating are the ones that follow a series of flawless prints. Why did the printer decide, almost randomly, to start printing garbage? Here are some easy ways to troubleshoot your 3D Resin Printer before you delve into time-consuming technical research.
This article assumes that your slicer settings are already dialed in and yield somewhat consistent prints. If you are dealing with a new out-of-the-box printer and/or are new to resin printing, then it is highly advisable to focus on tuning and running test prints until you are satisfied with the print quality. We are also assuming that the model you are printing has succeeded before, possibly many times, and is properly oriented and supported. If not, check that first.
Step 1: Stir the Vat
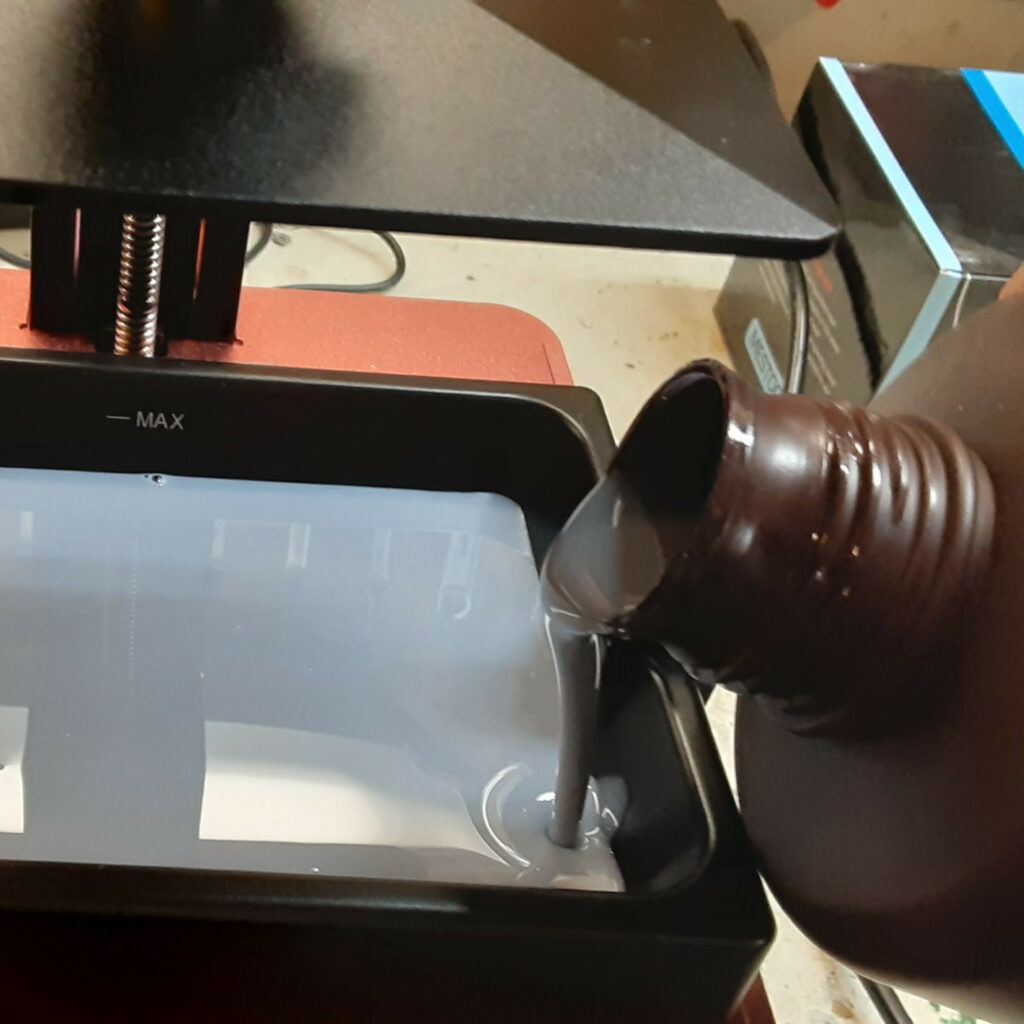
Always start with the most obvious and simple solution. Stir your resin! If resin sits for even a couple of days, it will separate out and not bind properly. This is especially true if you are using a resin blend like we use at the magic shop. To stir your resin, use a plastic spatula with no sharp edges. If your resin has separated, it will look like a chocolate-vanilla swirl frozen yogurt. Keep stirring until it is close to 100% homogenized. I use a 3D-printed spatula holder to let the spatula drip when I am finished. LazyTip(™): Home your build plate and then run it up 10mm and home again a few times. This will do a quick-and-dirty stir without needing to use a spatula.


Step 2: Clean Your Vat
Never start another print directly after a failed print without cleaning out the vat first. There will be pieces of cured resin floating around in your vat and the build plate will undoubtedly hit those chunks as it comes down for the first few layers. This will cause problems with the current print as well as possibly damage the build plate or FEP sheet. You can look for chunks by probing with the spatula while you stir. Remember: resin does not come in Chucky Chicken Style.
Use your printer’s vat cleaning feature (called “exposure” on some printers) to “stick” the chunks into a thin sheet of resin on the FEP. From there, place a paint strainer on a spare resin bottle and very carefully empty the vat. Once empty, scrape extra resin from the vat with a plastic spatula and then gently pry the resin sheet from the FEP and let it drain while it sits in the paint strainer. Sometimes I have to gently push up from the back of the FEP while simultaneously prying underneath the sheet from the top with the spatula. You also must be holding the vat over the paint strainer, so be sure to use all four of your hands. Or get someone to help!
Step 3: Align the Build Plate
If you have removed your vat, it might be a good time to align the build plate. Printers with four or more screws holding the build plate alignment need less maintenance than the ones with only two screws such as the Elegoo Mars series. Symptoms of a badly aligned build plate include parts of models not exposing correctly and/or ripped up supports. These symptoms are almost exactly the same as a worn-out FEP sheet. That said, aligning the build plate is much quicker than replacing the FEP.
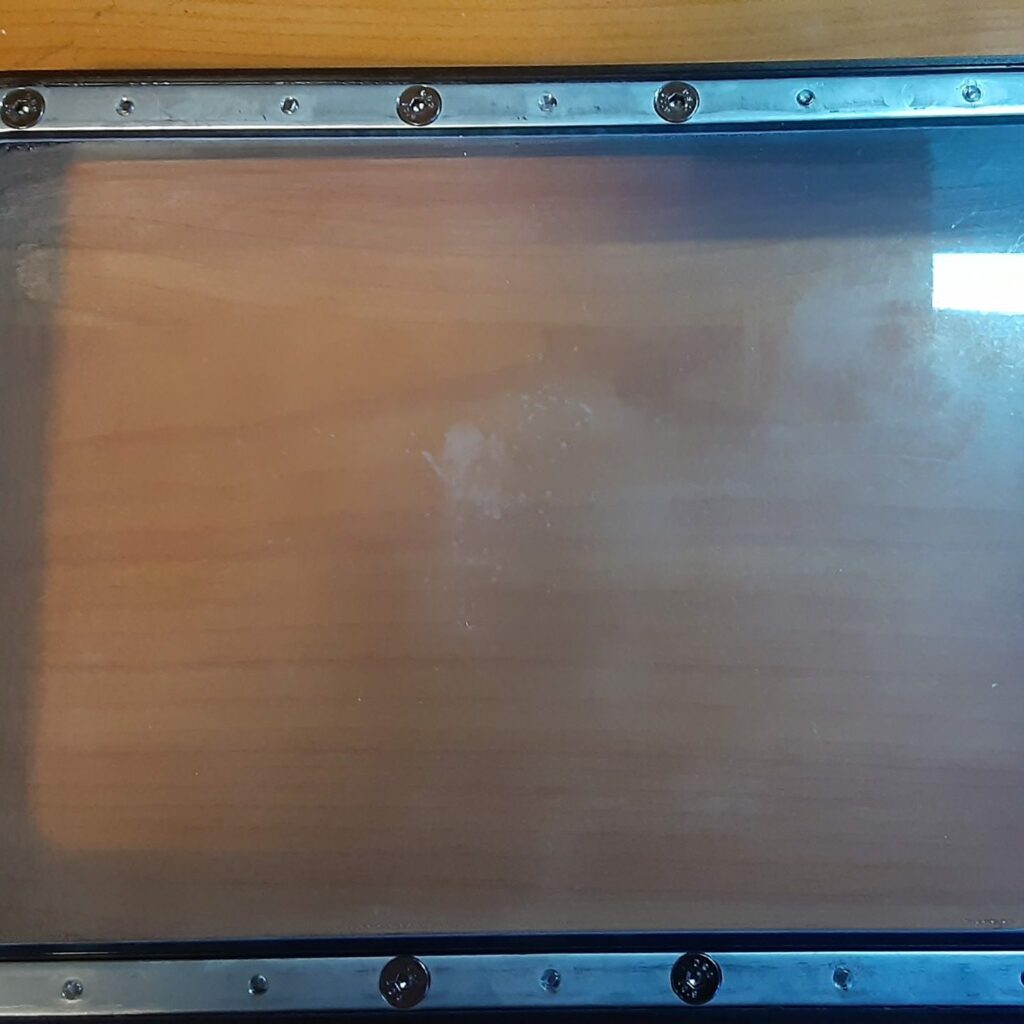
Step 4: Replace the FEP
Speaking of FEP sheets, if you notice that some parts of your model printed fine, but others did not expose properly or have been ripped from the supports, you might be in need of a replacement. FEP sheets last for somewhere between 15-20 prints before needing to be replaced. If you clean your vat and notice slightly opaque patches on the FEP sheet, those areas will not expose as much as the clear areas. Replacing the FEP sheet should be part of regular printer maintenance and only takes about 10 minutes once you get good at it. Make sure that your FEP is as tight as a drum head when you have replaced it, but not too tight or it will break. Too loose and the FEP will “snap” with each Z lift causing stress on the FEP as well as the models. Refer to my article on replacing the FEP on a Photon Mono X for more details on how to do this properly.


Step 5: Troubleshoot the Printer
If your vat is clean with a fresh FEP, your build plate is aligned and you are still getting failed prints, then this could be the time to look into some more complex troubleshooting. That said, mechanical problems are very rare, especially with newer monochrome screen printers. Making screen or Z-axis repairs falls outside of the scope of this article but suffice it to say that you will definitely know when you have these types of issues because it won’t simply be slight imperfections in prints but rather catastrophic failures such as not printing at all or an unintentional gelatinous cube.
Was this article helpful? Become a Patreon or buy me a coffee and I’ll write more!
Clicking on the Amazon Associate links in this article helps me pay the bills–and write more articles!


Amazing and valuable post about troubleshooting. Keep sharing such a valuable stuff Mr. James.